Charcuterie – Fermentation and Curing Chamber

Ok, I have to tell you about my latest bug. Growing up in Eastern Europe where EVERYTHING is cured, smoked, with prosciutto and sausages hanging in the pantry, I couldn’t help but try to reproduce the same delicacies here on US soil.
But I was faced with a couple obstacles like I had to keep my basement smell free, and keep my neighbors happy if I was to build a smoke house to cold smoke the meat outside for 10+ hours.
Here’s the first task for my charcuterie adventures in curing meat – the fermentation and curing chamber.
What is Meat Curing??
Without going into much detail and chemistry, (if you wish, you can read Wikipedia’s entry on curing meats) curing is the process of preserving and flavoring (sometimes cold smoking) using salts, sugars, nitrites, nitrates and/or a combination of these. It’s being done since time began and it became a craft in itself called gracefully by the French – charcuterie.
A Word Of Caution
Curing meat involves of course raw meat handling, which can become (if not careful) a source of all sorts of disease, not to speak about contaminated meat, etc. I cannot stress enough the need of proper sanitation, both, of your precious hands and the tools that get in touch with the raw meat. I will most likely write a whole post dedicated solely to safety on meat handling, since it is the most important ingredient of the charcuterie. You’ve been warned!
The Fermentation & Curing Chamber
 Since a major part of curing the meat is forming an environment with a stable temperature and humidity, I had to adapt to my current habitat. We have a basement used for all sorts of other things like laundry, music room, guitar amp building, junk storage, and so forth. The basement temperature unfortunately varies depending on the season sometimes falling even down to 53F degrees on our “happy” Chicago winter days with a humidity of 40%, making it a hostile habitat for curing meat, that get very fussy easily and need a constant 70F and 80% RH for the fermentation process and a 55F and 65% RH for the curing process.

Most of the inspiration to build a curing chamber came from Jason’s blog over at Cured Meats, who details his version of forming this controllable temperature and humidity environment using an old fridge. How clever! In my posts I will be referring a lot to his blog since a lot of my cured meats were made after his recipe formulas. My only twist on his curing chamber is that I am using mine as a fermentation chamber as well for the initial 48-70 hours at 70F of culture starter incubation (fermentation) needed.
Jason is using a separate box for the fermentation process since his curing chamber is already occupied with the longer, curing stage. I will probably be doing the same thing once I have a couple recipes going.
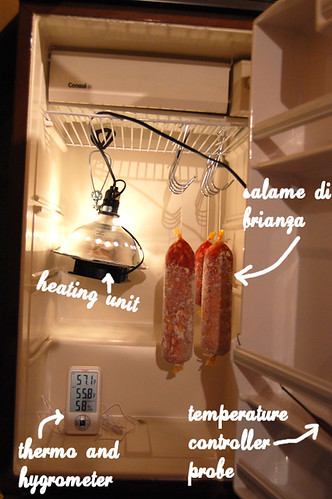
Simple as that! You can see on the photo on the right my curing chamber in its fermentation setup where the salami rests happily.
Yes, there is some investment in this hopefully successful hobby. One can of course splurge on the most expensive devices needed, and have everything top notch but I find a certain satisfaction in spending as less as possible and using, re-using or adapting items I already have laying around like this lovely dorm size fridge I never used in the basement.
Temperature Control
This is possibly one of the most important functionality of your curing chamber so you will need to buy a Line Voltage Thermostat with a remote probe that goes into your fridge. This way you’ll bypass the fridge thermostat controller that doesn’t go higher than I think 30-40F degrees which is to cold for curing.
More than likely I’ll end up having a separate fermentation box (with its own thermostat) like Jason when I start working in batches but for now, (since for my first try I used my curing chamber as a fermentation box), I’m using a thermostat that can control cooling as well as heat. Here’s why:
During winter when my basement’s temperature falls to about 53F degrees on the worst Chicago winter days, I need to boost the temperature in my chamber, specially during the fermentation stage where 70F degrees is needed using a light fixture unit turned into a heating unit. In that case I switch the thermostat to control heat so the heat would not go higher than I set it.
During summer, when the basement temperature can reach 68-70F degrees and I need my chamber to be at say 55F degrees for the curing process, I will switch my thermostat to control cold, and in that case the fridge will kick in bringing the temperature down to where it is needed.
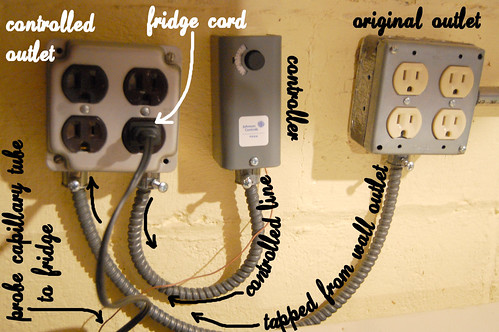
Here I bought a Johnson Controls Line Voltage Heat (OR Cooling) Thermostat from McMasterCarr (part# 1846K26) and mount it on the wall, connected to its own dedicated wall outlet where my fridge (or heating element is connected to. Now, since this setup requires some electrical experience, I don’t recommend doing it unless you KNOW WHAT YOU ARE DOING! It is not an easy setup and some electrical design is required. I’d be glad to provide the hookup diagram for those who want to replicate this but please do not keep me responsible for anything wrong might happen! You are on your own.

A much simpler way of doing this is of course using a cooling-only thermostat such as the Freezer Temperature Controller that plugs into the wall outlet and the fridge cord goes into it. You set your target temperature and you are ready to cure! Note that this thermostat doesn’t work for heating – it is only built to control cooling – that is if the temperature climbs, the thermostat will turn on your fridge, bringing the temperature down to the desired target temperature (ideally at 55F degrees for curing).
Now, of course if you have a house with an underground cellar or a pantry that has a steady 55F degrees and a humidity of 65% RH, consider yourself one of the lucky ones that will not need a curing chamber!
The Heating Unit
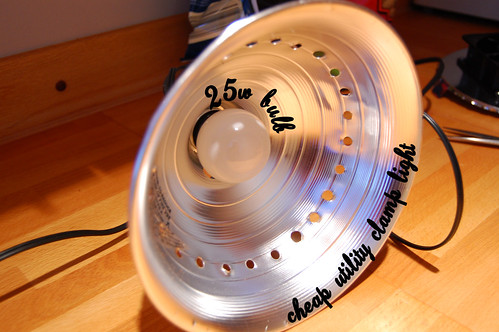
This is again inspired of Jason’s Fermentation Box contraption where he is using a bulb as a heat source and circulating air with a fan. Here I bought a cheap Utility Clamp Light and used a small 25w bulb as a heating source. Later I would probably switch over to a heat source other than light as light apparently is known to degrade fat:
Next, I went to my hardware store and bought a piece of duct sheet that I cut out a piece to fit the open surface of the utility lamp as a lid with four tabs that will hold this in place. I measure the fan mounting screws and then drilled a bunch of holes for the air circulation once the fan is on. I did the same in the lamp aluminum cover:
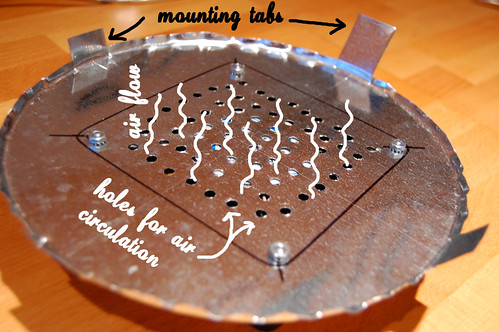
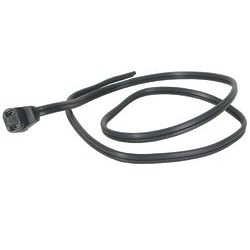
I bought a 115 VAC fan (4-5/8″ by 4-5/8″ and a angled plug fan cord that I soldered to the utility lamp socket so the two are activated together and connected to the same outlet cord:
This is the fan I got – it is usable with wall voltage (115 VAC), and the angled cord that goes with it:
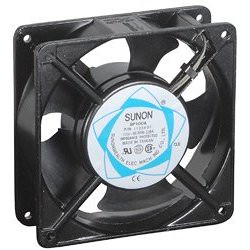
And this is the fan mounted to the utility light lid using four screws:

I still need to read up on the effect of light on the growing cultures used in the salamis, etc., but this makes up for a cheap way for getting the right incubation temperature your fermentation box.
Humidity Control
The second important functionality of the curing chamber is humidity. The curing process needs a 65-70% RH, for a slow steady drying. If the salami or sausage cures in a drier environment, there’s the risk of having the surface drying before the humidity escapes from within, trapping it inside.
One would usually use a humidifier inside the curing chamber plugged into a hygrostat from where you set the desired target humidity (80% for fermentation and 65-70% RH for the curing process). Since I didn’t get to buy a humidifier and a hygrostat (that controls the humidifier) yet, I am using a bowl with water to which I added salt as a humidity source. This keeps my humidity up to where is needed, although it is not as easy to control as with a humidifier.

I will probably end up buying them later on but for now the lovely blue bowl with the saline solution does great. I am eying the Eva-Mist edv-2500i Ultra Sonic Humidifier, because it has an in-built Digital Humidistat so I won’t need to buy that separately. And hey, it even has a 7 colors nightlight – just in case my salamis get lonely and have hard time sleeping!
As I mentioned I’ll probably have a separate box for the fermentation process once I have the lovely meats curing in the curing chamber but for now this is how I have my fermentation/curing setup.
A little update:
Right now I have my salamis hanging in the curing chamber (see image above) but the thing I am battling is in fact bringing the humidity down within the 65-70% RH since the meat has high humidity content still, and once I close the fridge door, the humidity spikes to 80%. Not bad, but a little too high for curing.
I do crack the door on my fridge every now and then to get some of the moisture out, but then the humidity falls down to 55% RH.
This will probably change later in the curing process, once the meat lost most of its moisture – the culprit for the humidity spike. I will have to write about this in a later post since this one is ALREADY too long.
Stay tuned, make sure you subscribe to hear news of my adventures in charcuterie!

 facebook
 instagram
 twitter
I totally appreciate your dedication and detailed work here. Thank you.
This is a great subject and not one often covered on a Blog. I am looking forward to more posts on this subject.
Cynthia:
Many thanks!
Ed:
Thanks for the comment – I will post indeed. Next in is the Pancetta.
Looks great, Gabi. One thing I feel I can add from my experience. Do not buy a humidifier with a built in hygrostat. Buy them separately. I went through 2 rather expensive humidifiers of this type in less than 6 months. Not until I bought a separate hygrostat unit along with the cheapest ultrasonic humidifier I could find, did my humidity stabilize. Good luck.
Can this be Scot from Sausage Debauchery Blog itself!?!?!? Thanks so much for commenting and coming to read my humble post on the curing chamber! I am HONORED! I read and admire your blog much!
Thanks for the tip on humidifiers with in-built hygrostat! This is precious coming from you.
Do you have an advice on the type of hygrostat I should get?
Thanks a TON!
I have one from Green Air Products. But, good luck finding one. Fortunately, sausagemaker.com has made it easy. They have both humidifiers and humidity controllers available now. Wish that was the case when I started. Their humidifier is a bit pricey. I got one at amazon for $25. Same one I recommended for Jason. Ask him how he likes it.
Scott –
Just got my hands on a Green Air THC-1 like the one Jason talks about in his blog for $71.00 shipped off ebay! YAY!
Please tell me it is a good score! Please!!! 🙂
thanks!
That’s the one! Good price, too. You’ve just done yourself a huge favor. It’s a good unit, as it will dehumidify if need be as well. You can now set it and forget it. I go about 2 weeks on a tank of water. Enjoy.
Thanks Scott! I imagined this must be a good deal – new ones are running at least double on Amazon! The user already shipped it! That was FAST!
As for the humidity problem, how about having a humidifier and a dehumidifier on 2 separate controllers?
Alessandro – That would definitely work but I’ll quickly run out of space (and money!) in my small dorm-size refrigerator. But hey, very doable! Thanks!
A dehumidifier is a good idea for big rooms but I don’t think they make that small of 1 that fits in a frig.
Probably just having a tray with kosher salt would be enough.
This is the first year I will be making salami’s & Soppresatta with cultural starters. I’ve always made them without cultural starter, with 45 degrees and 50% humidity. Is there that much of a difference in the taste and texture with cultural starters and high humidity?
Thanks for responding so quickly.
I found a temperature & humidity combo control. It is called the C.A.P. Air 1. Does anyone know if it any good?
Joe – thanks for the comment. Never heard of it. The big thing is to have it calibrated right. Many of the units have the readings all out of whack.
Joe – it definitely adds to the tanginess of the meat by increasing the acidification. And depending on the fermentation temperatures and culture types you can have a more traditional Italian-like taste (as I used my F-LC here) or more of an “American” taste. More on it here: http://www.butcher-packer.com/index.php?main_page=document_general_info&cPath=36_205&products_id=741
All the years I have been making salami I could never get them round. I always had to flatten them because if I didn’t there would be air pockets. By doing this slow ferm. process will that help keep them round?
Joe –
I stuffed by making small meat balls and each time squeeze really hard the casing while pricking the air pockets. It is cumbersome. Next time I’ll buy one of those heavy duty stuffers. Not sure if the slow fermentation will help to keep them round. I thing stuffing it well will do.
Gabi
I just made my first batch of salami’s. I made Pepperoni & Genoa Salami. I really hope everything works out. I wanted to tell you I have a 10 pound stuffer & it works great, but I have the long one that takes up to much room. When you go to buy one get the tall one. the sausage makers have nice ones.
Joe! Thanks for writing! Wow! Impressive! You made pepperoni!?!? You inspire me! What recipe did you use? And thanks for the tip on the stuffer. What brand you have?
Gaba, the recipe I used came out of [THE ART OF MAKING FERMENTED SAUSAGE]
There are a lot of recipes for peperoni in there, I used the traditional one!
The suffer I have is a Weston, made in Italy. The store is THE COUNTRY [HEINSOHN’S] STORE. I think it’s a 11 pound stuffer.
P.S. Are you from Chicago?
Gabi, I checked the weight on my salami’s & they already lost almost 30% of there green weight! Is this normal? They only been in for 1 1/2 weeks & 3 of those days they were fermenting! I have a digital scale so I’m sure about the weight. I have my temp. at 58 & my humid. between 75-80%.
Joe – Yep, live in the NW suburbs. You have the vertical 11 Lb stuffer? Are you happy with it? Thanks for the tip on Pepperoni recipes. My local library has that book there.
Joe – I would give them at least two weeks. It sounds like they are doing fine. 30% water loss is a little on the soft side. I would give them a taste after 2 weeks and check the water loss then. You should be at say 37-40% by then. The water loss curve slows down as the salami is aging. Let me know.
Gabi, I really like my stuffer but I can’t do it by myself it’s to long. My wife helps me but I hate bothering her. So I us my grinder to stuff small batchs of sausage & salami. My grinder is a Torrey M-12FS now that’s a great grinder!!!
Now all the salami recipes & books I read tell me to dry the salami’s for 2-3 months or 35% of the green weight. I just never used those culture starters before, that’s why I’m wondering why they say dry for 2-3 months. If I lost that much weight in the first week.
Gabi
I’m from Chicago too. Have you ever heard of this soppressatta contest they have every year.[Well this will be the 4 annual contest] Frank Balesti host it.
It’s on Sunday Sept.26 at 3:00pm. in Countryside. I’m going to enter my soppressatta this year.
Maybe you can clamp it to your counter top? Oh – that Torrey can make wonders!! It is definitely a good investment. Depends also on the thickness of the salami. If it is thinner, it will get dryer faster. I don’t suspect the cultures play a major role in the drying speed to be honest. How big is your curing chamber? Mine is a small dorm refrigerator, and the actual problem I usually have when placing the new (green) salamis to cure is too much humidity (>90% RH!). So in the first 2-3 weeks I need to crack the fridge door just a little to let the humidity out. Also I am pricking my salamis quite a bit to get rid of the air pockets. You must have a very dry curing chamber maybe?
Never heard of the Soppressatta contest! Although it sounds very interesting, I don’t think I have a chance to even come close – hehe. I don’t even have the time to make and cure them by that date. But heck, that contest sounds very interesting to attend and sample some of the Soppressattas! Is there a web site with the info? Good luck with your Soppressatta!!!
Gabi, I have the same frig you do. It was sitting around doing nothing. I had the same problem with the humidity. I was using kosher salt but I was changing it everyday. I had a bag of rock salt & I was wondering if that would work. IT WORKS GREAT!!!! All I do is dump out the water & put the salt back in the frig.
Gabi, the web site is [great-chicago-italian-recipes.com] or you can type in soppressatta & find it too. The soppressatta I’m going to enter I made over the winter. I vacuum seal the salami’s when they are done curing. As long as no air gets to them, & you keep them in a cool place they stay. when you vacuum seal them the natural oils come out of the salami’s & get sealed in the bag. It’s like putting them in oil but you don’t have to eat all the oil!!!
Chicago has a soppressatta contest September 26 2010 at 3 pm parkplace banquet hall 6240 joliet rd countryside up 60525 (708) 588-1756 all participants must bring in one peesliced soppressatta to enter all entries are secretly recorded trophy prizes all profits will be donated to Italian war veterans let’s keep the tradition alive.Italian gift baskets and a homemade soppressatta press will be rattled off.let support are vets!
This is Frank Balestri if anyone has questions about my Soppressatt Contact me at (773) 370-1621 Thanks
You Can also see my instructional video Titled Sodfather Part 1thru 3
I was just looking for a little information on the sausagemaking.org forum when I spotted Gabis Salame di Brianza and man was that an inspiration. From there I followed his trail to Scotts blog, then here and finally to Franks site. What an education!!!
I’ve made my own sausage for years and have always wanted to try making my own dry cured sausages and I think this is the year, especially after finding these sites.
I live in Chicago myself and I’m sure gonna try to get over to Countryside in September. I love Soppressatta (hope I added enough consonants) and can’t wait to make my own.
Mike
Gabi, pepperoni is done it taste good. Next time I will make it with all pork. This recipe had 30% beef in it & I think beef makes it a little dry. I also lost about 50% of green weight in 4 weeks. The starter I used was T-SPX next time I’ll use
F-RM-52 if it is only going to take 3-4 weeks to dry. The genoa’s are all most done to I will give them another day or two.
[Frank] thanks for the info. I hope to go this year if I don’t have to go out of town.
Thanks Mike – How was Countryside? I wasn’t able to make it unfortunately.
Joe – definitely, 100% pork will make it supreme, I promise that. How did the Genoa turn out? Did you make it to the Sopressata contest?
The Genoa is really good! Next time I’m not putting in any beef & I’m going to ad a little wine.
I just started a new job & I’m almost never home anymore, so I mist the contest! I hope it was fun.
Gabi have you made any new salami’s or did you find that book we were talking about?
Gabi- I have been making more salami’s again. I have a question for you, this batch of salami’s had a little mold on them so I wiped them down with vinager. Now they have been drying for about 4 weeks & the casing are sticky & smell bad. I cut open 1 & the meat smells good. Do you know why this could be happening? I have the same frig you do & I put 15lbs. in there{I know that’s a lot to put in there}.
Hi Joe – sorry for my delay. Hmmm not sure. That’s what happened with my latest batch of Pancetta. I kept wiping the spots with vinegar and they kept coming back. In the end it had a slimy surface so I tossed it. I am suspecting some sort of bacteria.
Gabi, so when the salami’s were done I throw them all out. They had that bad smell & they were sticky. I think there was to much salami in that lttle frig at 1 time. So I have a new batch going only 5lbs! The latest problem I have is the frig is to cool when it’s not on, because of the winter.
On the subject of lowering the humidity in the cabinet while curing, I have found that by plugging the heat source (a ceramic reptile bulb) into the hydrostat and setting it to de-humidify that the humidity can be lowered and maintained at the appropriate level. As the humidity rises, the heat comes on and causes the freezer/refrigerator to run which lowers the humidity. I use a recording temp/humidity measuring device and seem to get very stable results. The Green Aire product has a switch to humidify or de-humidify.
Gabi made some new Genoa it came out great. I only made 5 lbs thow. I am looking for a new salami recipe do you have anything or me?
Gabi, I checked out your other sites. The cold smoker looks great. Thats what I have been thinking about making. Have you ever tasted smoked mozza? It’s great all you do is take a piece of mozza & cold smoke it for a couple of hrs.
Its that time of year again.Frank Balestri’s 5th annual Soppressatta Contest.Sunday September 25th,3pm dinner 430pm contest starts.Parkplace of Countryside Banquet Hall 6200 Joliet rd,Countryside Il.708 588-1756.All participants must bring in one or two presciled Soppressata to enter.Italian gift baskets and a homemade sopreessatta Press will be raffled.All profits will be donated to Heart Patient Nichoas Tobar,son of Lt.Anthony Tobar (Chicago Fire Dept ),And Dawn ( Alberico ) Tobar.Any Questions Contact me at 773 370-1621 Thank You Frank Balestri
hi..im going with the hygrostat option+fan+humidifier……i had a humidifier that wasnt doing the business, witha built in humidistat…..do i just go for one without that and if so, how do i set it…..?
thx
Yes the humidifiers with built in humidistats aren’t accurate at all. That’s why I went with a Green Air THC humidistat – where I have my humidifier plugged in. Not a cheap option but well worth it!
I am interested in your wiring diagram for the thermostat set-up. please send to my e-mail, Thanks
Tony Joseph
Tony –
I don’t have one – I just followed the instructions from the site i mentioned in the blog.