Croissants – A La Julia Child


In honor of my culinary hero Julia Child and upcoming movie about her life Julie & Julia (where Meryl Streep plays Julia Child, and Julie Powell is played by Amy Adams) I decided to bake one of her recipes from her TV show The French Chef With Julia Child 2 – Croissants.
Although the process might sound intimidating it is in fact quite simple. Hey – if a rookie like Julia could make it, you can make it too! I will go with you step-by step as presented by Julia in her show. Read along – it is fun and delicious!
Julia Child, More Than A Character
As she goes through her rolling pins collection in the Croissants episode of her late 1960’s TV show The French Chef, where she flamboyantly throws one of them in the trash bin, concluding that “It’s good for nothing, I don’t know why I keep it”, or as she encourages you to take heart when you flip anything in a pan to do it with the “courage of your convictions”, while she spills most of her potatoes on the stove top, Julia Child – the pioneer of cooking shows, gives hope for cooking newbies like you and me who feel so small and intimidated while watching modern big-wig cooking shows where everything turns out perfect, manicured and shiny!
I was extremely excited to hear of the Julie & Julia movie and from what I’ve seen of the trailer, Meryl Streep does an outstanding acting in playing the role of this extraordinary woman! Can’t wait to watch it on 7th of August!
Le Croissant
Considered the donut rival in America (and rightly so), the croissant gained quick popularity in every pastry shop, continental breakfast plate, and even in donut chains. Charles Dickens wrote about the Croissant in his 1872 All Year Round periodical, “the workman’s pain de ménage and the soldier’s pain de munition, to the dainty croissant on the boudoir table“.
But it’s humble origins are mentioned long before that year, when August Zang (an Austrian artillery officer) opened the Boulangerie Viennoise in 1838 in Paris featuring the popular kipfel, that inspired the French pastry chefs to roll out a nationalized version calling it Le Croissant, due to its crescent shape.
Le Recipe
As intimidating (and cliche) as it probably sounds – if you can make a humble omelet, you CAN bake a beautiful batch of 12 Croissants. I mustered up enough courage by watching Julia’s episode on how to make Croissants, and being baking a couple of successful batches since then – well, one of them turned out more browner than needed as I left them in the oven too long [ahem!]. The nice thing about it is that the dough can be prepared ahead of time, and frozen so when you are planning on baking, all you need to do is to get your oven going and your appetite. There are a lot of Croissants recipes, I am sure, but just for the sake of celebrating the movie and the women who inspired it, I’ll stick with her version.
[ad#300×250-green]
Flour Options
Probably the most important step in the recipe is to use the right flour type for this type of pastry. Julia suggests using a low-gluten flour so the dough can be easily rolled without becoming rubbery, etc. You could for instance use a mix of 1 part unbleached all-purpose and 2 parts unbleached pastry flour. She also adds tasteless oil to the mix, to help tenderize the dough.
Yeast Dough
Even if today’s dry yeast has a very small chance of failing to do its job, I will give it a chance to prove itself to be worthy of our croissant dough.
1 Tsp dry yeast
1/4 Tsp salt
1/2 Tb sugar
1/4 cup warm water (not more than 110 degrees, otherwise you’ll kill the yeast)
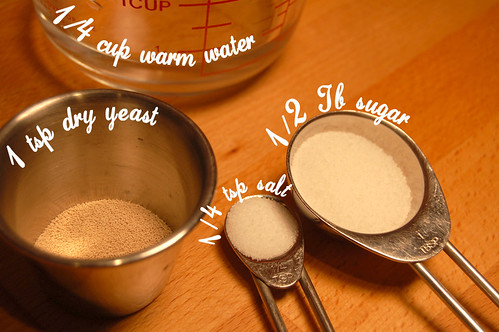
Start by mixing all these ingredients with the warm water until dissolved, and let it sit for 5 min. If the yeast is active (and it should) it will form a soft foamy mass on its surface:

Croissant Dough
No big secret here to be learned. Make sure that when you measure “1 cup of flour” you actually sweep off the excess with the edge of a knife so you will have a consistent quantity. The quantities given here are good for a batch of 12 croissants. I usually double it and freeze a half of the dough (after I have the butter in it).
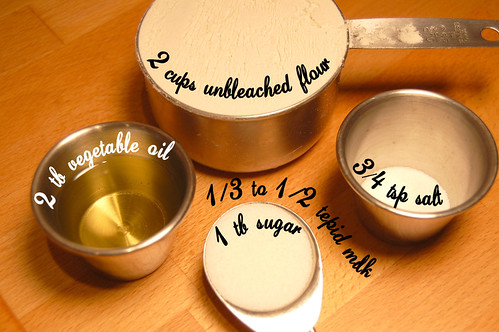
2 Cups of your flour mix (see Flour Options above).
1 Tb sugar
3/4 Tsp salt
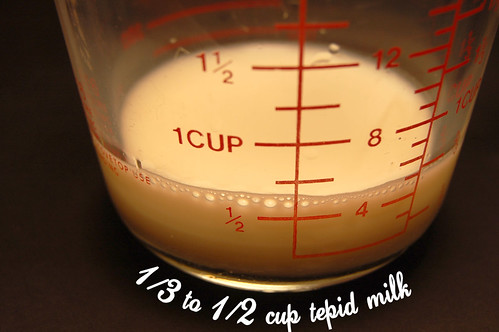
1/3 to 1/2 cups tepid milk
if using unbleached flour: 2 Tb vegetable oil (I used Canola)
if using bleached flour: 4 Tb vegetable oil
Blend all the above in a mixing bowl (don’t forget the yeast mix) with a spatula into a sticky mass, then out on the board:
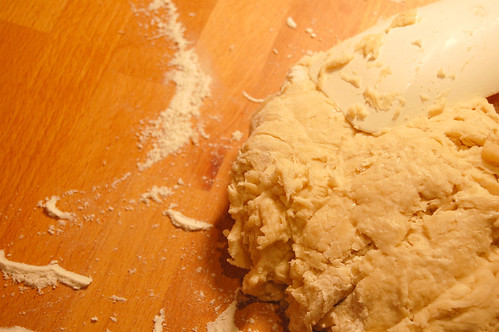
Time for some punching – works well when you are mad. Julia suggests the lift-and-throw motion and as she talks and demonstrates the moves, the dough gets stuck to her pastry scraper and goes flying as she exclaims “Whew!” and goes on with her explanation without any trouble… Typical Julia Child! Love it. Un-edited fun!
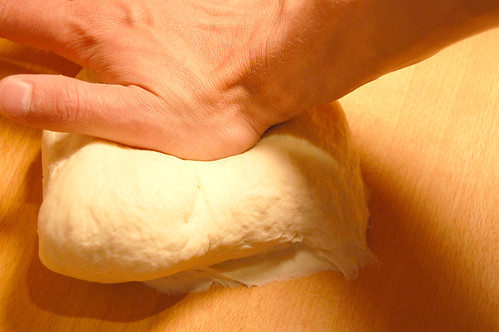
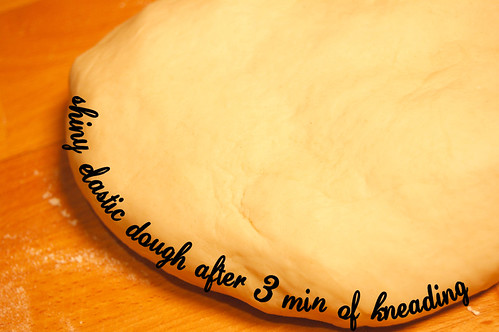
Keep on being rough with your dough for about 3 minutes – it’ll be somewhat sticky at first but after a good rapid fold and knead with the heels of your hands it will become elastic, smooth and will not stick to your hands anymore:
Time to rise. Plop the dough into a bowl and do a criss-cross scissors snip on its surface to help it rise. Then cover it with a plastic wrap, and let it rise until it becomes double in bulk:

Rising time depends on the room temperature. I found that if I do this in the summer, rising is faster than in winter. About 1 to 1-1/2 hours at say 75 degrees will suffice. Don’t keep it in temperatures higher than 85 degrees or longer that needed (over-rise) since that wll impart an unpleasant taste. At this point you can retard the rising by placing the bowl in the refrigerator:

Then, punch it down into a flat circle, wrap it in wax-paper and chill it for about 20-30 minutes. The chilling is important as it makes working the dough much easier: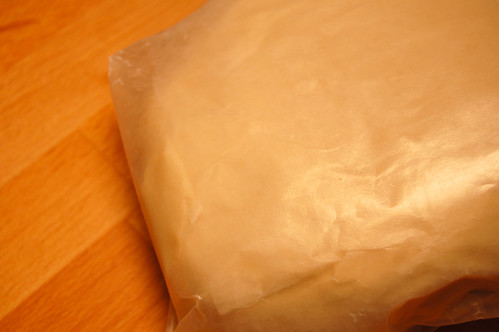
Rolls, Turns and Chills
If the croissant recipe would be considered a somewhat complicated procedure, than this particular step would probably be the one that will need more attention. What makes this basic yeast dough (good for bread, etc.) become a croissant dough is a good old stick of chilled butter. It is butter that makes the world turn. And it is butter that will make the 82 dough layers for our croissants: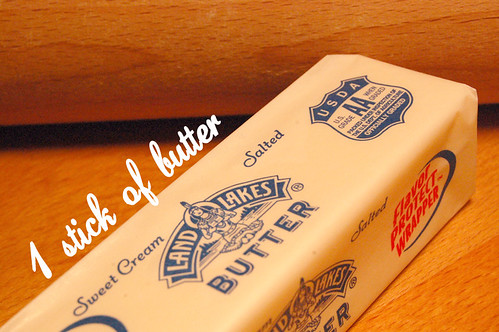
Time is now to beat the daylight out of this chilled butter with your rolling pin. The idea here, my friends, is to work the butter into a malleable consistency, free of lumps and very fast, to keep the butter cold – working with melted butter is just not fun: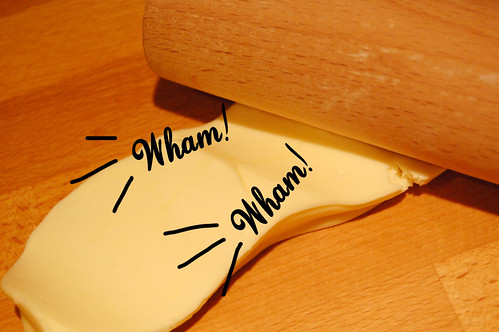
Then finish this procedure by pushing the whacked butter bits by bits out with the heel of your hand, so it is completely lump-free: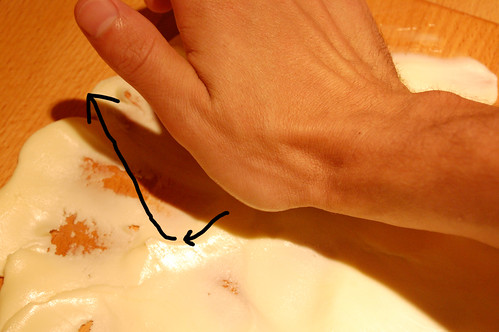
Lovely, huh? Having fun yet? Now, press your dough (I roll it) into an approximate 9″ diameter circle, then form the butter into a 5″ square (square-ish in my case) and place it on the top of your dough (centered):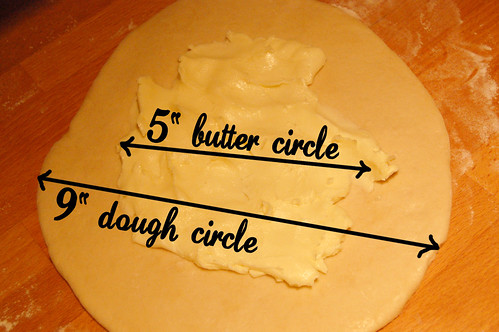
Now gently flip the dough edges (without ripping it!) over the butter and seal in the butter by pinching the dough: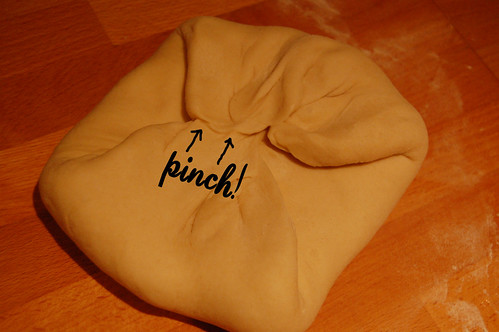
Voila! now you have a nice package of dough with a stick of butter inside, ready to be massaged into many layers. For that, flour your rolling pin and both sides of your dough, place it on your board with the seal side up and start gently rolling back and forth from the center towards the edges to form a rectangle of about 15″ long and 5″ wide. It doesn’t HAVE to be exact, but try to at least get close to that dimension. If there are butter bits that poke through, just pinch the dough over that spot to re-seal it. Also, if the dough became too rubbery (read warm), chill it again for about 20 minutes and continue from where you’ve left it. What you want here is to evenly spread the butter between the two dough layers (this gets you ready for your next step):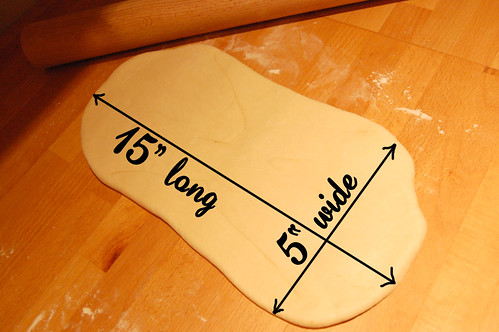
Turns #1 and #2
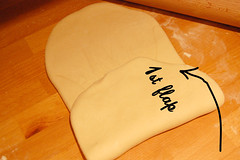
Okay. What’s a turn in culinary lingo? Julia Child defines it as having the dough folded like a business letter in 3 even layers. And really, that’s exactly what it is. Gently fold the bottom of your rectangle to the center of the dough then fold the top flap over it the same way. That’s defined as turn #1:
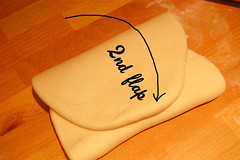
Then once again, roll out the dough to the initial 15″ long and 5″ wide rectangle to prepare it for turn #2 just as before. Keep the edges as straight as possible (I re-align them with the rolling pin). You will see that it will look more like a rectangle than before. Rinse and repeat – you got it right?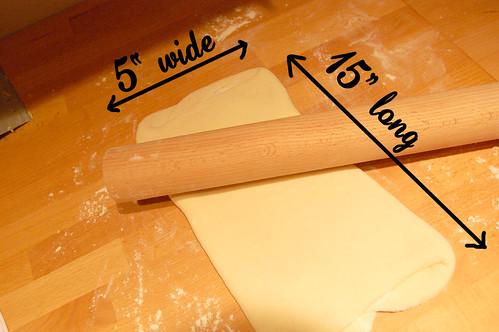
By this time (after turn#2) your dough needs some chilling to be able to roll it another 2 turns. Leave it folded as a business letter, flour it lightly, wrap it in wax-paper and place it in the fridge for about 1-2 hours: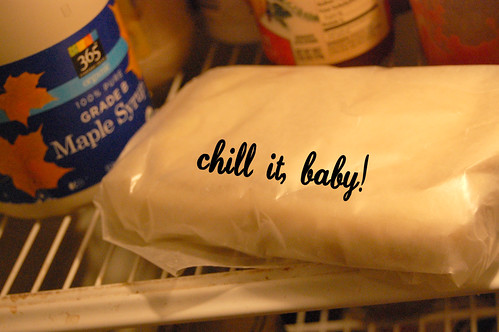
Turns #3 and #4
After the time spent in the fridge (1 to 2 hours) the dough is relaxed and ready for turn #3 and turn #4. Really nothing special here. Just repeat the same process as for the previous two turns – two rollings into the 15″ long and 5″ wide rectangle and two business letter style folding. You will end up with 81 layers of butter between 82 layers of dough. Again, by this time the dough is probably getting to rubbery to work with, so back in the fridge it goes for a 2 hours chill.
Croissants Shaping
After the 2 hour chill, out of the fridge the croissant dough comes and onto a lightly floured board. This time roll it into a 20″ long by 5″ wide rectangle. Try to keep the edges as straight as possible: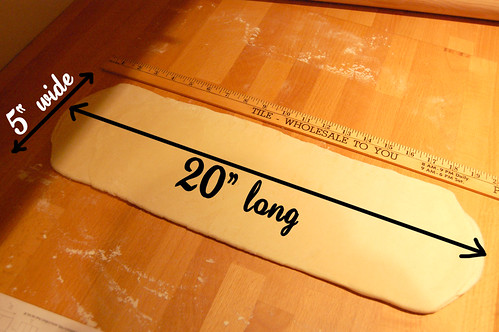
Next, make a middle crosswise cut and chill one half: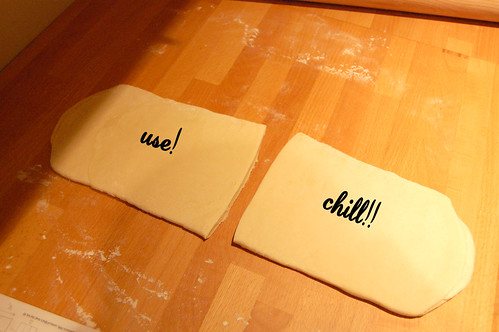
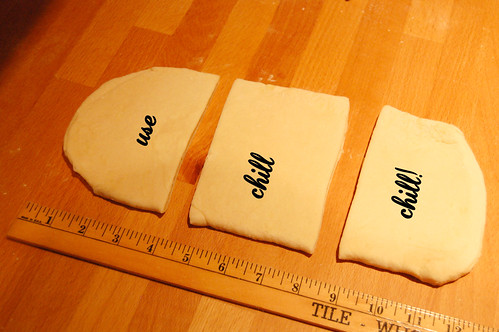
Now, roll the one half of the croissants dough into a 12″ long by 5″ wide rectangle and cut it in thirds and chill two of the thirds:
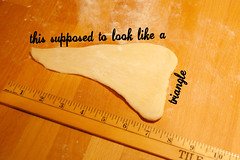
Now take one of the thirds and roll it into a 5-1/2″ square and cut it on the bias. Mine here doesn’t look terribly square-ish but you get the idea: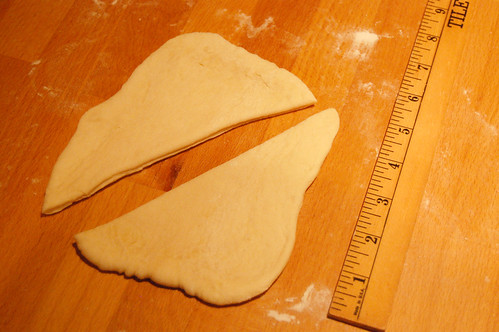
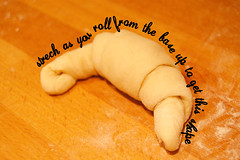
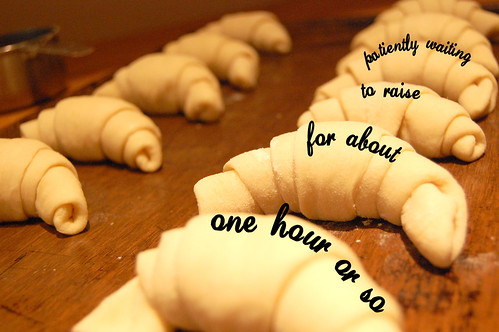
Roll the triangles out to extend to about 7″ long and shape it as much as you can into a isosceles triangle (where two sides are equal in length). Now starting at the base, roll up the dough towards the tip of the triangle, then bend it into a crescent moon form, and place it on a buttered 12″ x 14″ baking sheet (not too close to each other so they don’t fuse together while rising and baking) with the tip of the triangle on the bottom so that it wouldn’t unwrap during baking. Form the rest of the dough the same way into a total of 12 croissants, and let it rest for an hour covered with a plastic wrap. This might be a good time to get your oven going – set it to 475 degrees (mine takes about 45 minutes to heat up). You can freeze the risen croissants for later baking and pop them in the oven while frozen:
Glazing and Baking
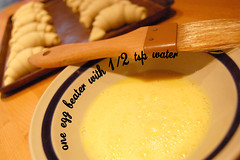
Again, no rocket science here. Simple egg-wash. Paint the risen croissants with one egg beater mixed with 1/2 Tsp water:
Then pop them in the pre-heated 475 degree oven and really – keep an eye on them because they bake very fast. Usually something between 10 to 15 minutes depending on how dark brown you want them to look. Don’t do any other activities during this fast bake – you will forgot about the oven like I did so many times. I tend to leave them in until they turn dark-brown. Let them cool on a rack for about 10 minutes and resist the temptation of eating – the are HOT!: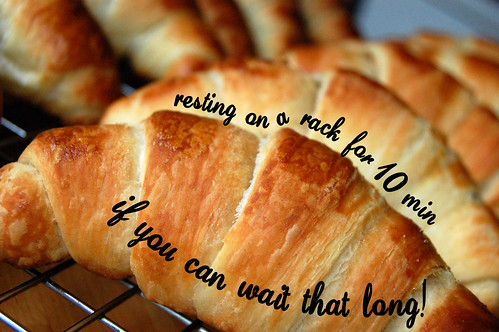
Voila!
Julia mentions in the episode that she could eat Croissants in the morning, for lunch, for dinner, mid-morning or mid-night snack and so on. And I don’t blame her. These evil Croissants are so wicked delicious that can be enjoyed throughout the day. I tend to like them in the morning and for lunch, as a sandwich, or simply with any sort of jam or marmalade. Too bad we don’t have Le Figaro, the French news paper that Julia grabs at the end of the show while sitting down and enjoying her caffé au lait, and freshly baked croissant.


 facebook
 instagram
 twitter
You did an amazing job! I’ve made puff pastry before and though it’s time consuming, it’s easier than it looks. The croissants are gorgeous! I especially love the egg and bacon one. mmm!
PS, love the step by step photos!
Elle!
Thanks so much for the comment, and compliments! They also tasted fabulous! The egg and bacon croissant was my wife’s version – lovely I must say.
cheers!
Fantastic!!! I loved this post and especially the step by step instructions. 🙂 Gabi, I think this is one of your best posts. I am also looking forward to seeing the movie w/Merryl Streep, looks to be a good one. Thanks for this posting, you put a smile on my face and hunger for some croissants in my stomach. Excellent.
Wonderful post!!! I love the pictures and all the steps.
Sam! Thanks a LOT for your comment!!
Wish I would be closer to you – although I bet frozen croissants can be shipped with no problem. All you need on your side is a pre-heated 475 degree oven!
Erica!
Thanks also for your comment!! Hopefully the step by step guide makes things easier. Enjoy and write back if you have any questions. Cheers!
This is great! Thanks for the detailed explanation — I’ve always been daunted by croissants but I think I’ll try them now.
Also — I read your blog because I just moved to Romania and like reading about your Romanian recipes too. Fun stuff.
multumesc,
hollie
Thanks Hollie, for reading my blog!!
I wish it would be more relevant to what’s going on in Romania but I am so disconnected lately.
Where in Romania did you move??
Cheers!
Gabi.
Thanks for sharing. I love the step by step pictures and the encouraging words. You broke down the recipe in a really no big deal nice way. Thanks again.
This was my first time on your site, and I am inspired and impressed. The accompanying photos are particularly helpful, and I am aiming to try this recipe as soon as possible.
I do have a question — you noted, “I usually double it and freeze a half of the dough (after I have the butter in it).” At which point in the process is the mixture considered to have the butter “in” it? After it has been folded into the intial pouch-like arrangement with the 5″ butter circle inside the 9″ dough circle? Or can the dough only be frozen once the butter has been integrated into the dough through the various rolls and turns? Or after the croissants themselves have been formed, so that you only need to bake them off?
I am very anxious to give this a try, but I want to make sure I have enough time set aside for it, and would like to see if there are ways to split up the process between a couple evenings. I completely understand if that isn’t feasible, but I thought I’d ask!
Nora!
I am flattered! And whoa now I have some pressure – once somebody tries out one of the recipes.
Good question. Indeed as you mentioned, I usually double the quantities (to result 24 croissants), and I freeze half of it after turns #3 and #4, right before the Croissants shaping. This way I have a prepared dough (with the butter layered in turns 1 to 4) to be used whenever I wish. All I need to do is to let it thaw for about 30-40 minutes until workable into croissants shapes.
But just ignore that sentence for now if you make only the 12 batch of croissants.
And also – yes – Julia mentions that you can also freeze the formed croissants (after they rise for say 30-40 minutes) and all you need to do next is to pop the frozen croissants directly into the oven at 475 F and keep an eye on them (12-15 minutes until golden brown).
To sum it – yes – you can easily split up the process between say three evenings if you wish or even two. Or a long day for that matter. For instance:
Day 1: Prepare and knead the dough (30 min), let it rise (1 1/2 hour), form it then turns 1 & 2 (15 min), chill (1 hour), turns 3 & 4 then freeze for next day.
Day 2: Thaw (approx 40 min), form the croissants (30 min), let them rise (1 hour), and bake – or optionally, freeze.
Day 3 (optional): Bake frozen croissants directly in the preheated oven (10-15 minutes)
Hopefully this will give you a little direction in choosing how many days to split, etc.
Keep me in the loop, glad to help! – cheers!
I just had the most delicious croissant so I decided to google for croissant recipes and chanced upon your blog. And I have to say wow this is a gorgeous blog post!!! So much effort! I’m totally inspired =)
Mrs Multitasker:
Thanks for the comment! You should give it a try! I checked your wonderful food blog and if you can do all those nice recipes, you sure can do croissants.
Wonderful!!!! My friend Annie shared a link to your wonderful step by step instructions to making croissants…. THANK YOU for the photos… and step by step instructions! I’m going to give it a GO!
My husband and I have recently been inspired by Julia Child and are cooking many of her recipes from Volume 1. I was looking for a great croissant recipe yesterday and by chance found your site using Julia’s recipe! Wonderbar! I am thrilled at your step by step approach and I love the details! I will venture to make them tomorrow as we are snowed in and sounds like a lovely project for the last day of fall! Cheers!
Toni: Thanks for the comment! My pleasure – so, how did it turn out??
Michelle: Julia inspired me in many ways too – she is my culinary hero. What else did you cook from her volume? Let me know how they turned out!
Hi Gabi! Haven’t tried the croissants yet… want to though!
Right now I don’t have a kitchen… we’re finishing the inside of our new home.. and hope to get sheetrock up this week… well… at least some sheetrock up!
Toni
Gabi,
Thank you so much for all of your effort on this post! Altough, I am by no means an expert cook, I love making everything from scratch for my hubby and 2 little ones. I actually have bread rising in the kitchen right now!
My husband & I spent our honeymoon on the island of St. Martin (the French side). We ate the most incredible croissants everyday & could not find anything that came even close after returning home.
Just yesterday, a friend who shares my passion for cooking, showed me the 2 Julia Child cookbooks she had received for Christmas. I looked at the croissant recipe & it actually intimidated me a bit. I knew I would certainly try it but “someday”. I decided to try to find the recipe today online & came across your blog. With your step-by-step instructions, pics of what each step should look like & sense of humor, you have inspred me to try them this week. But, I do have a question. I grind my own wheat. So, what I use for baking is actually more of a whole wheat pastry flour with the germ. Can this be used for the croissant recipe?
Thank you so much!
Dawn Marie
Dawn Marie:
See, comments like these make my (18 degree F in Chicago) day! VERY glad to see that my post encouraged you to give this croissant recipe a try.
I only tried the Croissants with unbleached white flour. Not sure what to say about the whole wheat. I’d say try both (with white and with whole wheat) and see what comes out. The only different thing should be the taste – all else should work the same (raising time, folding, etc.)
You made me curious – let me know of the result! You have a mill???
thanks for the comment!
Tony:
Hehehe – I think you need a kitchen to bake croissants. A small needed ingredient.
Good luck with finishing the kitchen – I know how hectic that can be – we did that last year.
Hi Gabi!
Thanks for your reply comment!
We’re sheetrocking the kitchen now… and the cabinets are being made as I write this!
Can’t wait to give your croissants instructions a try in my new kitchen!
Toni
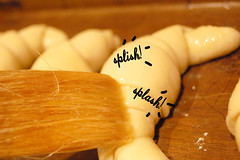
You are so cute with this “snip-snap” and “splish-splash”!
I’m gonna try baking these as soon as I can, it sounds so yummy..
Thanks in advance for the recipe!
I’m so glad I found this site…Keep up the good work
How long do you cook them when they are frozen ?
This was my first foray into making croissants and I tried to follow your expertly photographed and explained steps. However, my croissants were not light and flaky, but dense and very biscuit-y. The farthest consistancy from croissants.
The only problem I had was that my dough kept expanding sideways when I was rolling it out, and spread far beyond the 15″ x 5″measurement…far enough where I had to fold it again lengthwise because it was nowhere near the shape of a rectangle anymore and do more rolling. I think it might have been the extra folding and rolling out that turned mine into biscuits. Was that the culprit? If so, how do I keep the dough from spreading horizontally when I’m trying to roll it out vertically?
Thank you!
Flora:
Thanks – let me know how they turned out! Cheers!
Courtney:
Sorry for my delay. Hmm. Strange. What baffles me is the expansion of the dough. I literally need to fight while rolling to get to those approximate dimensions. Specially after the dough gets warm again since the gluten gets developed and tends to hold the dough together.
I think your rolling was correct. The trick I catched Julia Child doing on her episode on Croissants was that she sort of tucks the vertical edges of the dough back with her rolling pin then she gives a couple rolls vertically. Then she does this again a couple of times.
Just curious, what kind of flour did you use? Was that a mix? Did you add the two Tbs of vegetable oil to the mix?
I suspect the flour type you used more than anything else.
Let me know.
Thanks Gabi for the wonderful demonstration 🙂
I tried the croissant twice. I made everything by the book. BUT, my croissant does not come out puffed. It comes out as tough as a brick.
I noticed that after the final rise (after the croissants are rolled) they do not rise to triple the size and they are not light and springy as described by Julia!!
What went wrong ???!!!
What is the pastry flour?? I used all purpose flour (bleached), the recipe in the book states all purpose flour. Then when I looked at the ingredient chapter, I found an explanation that the french flour can be prepared by mixing, 3 parts of unbleached all purpose flour and 1 part bleached cake flour!! Is that what I am supposed to do??
Or where can I buy the pastry flour that you suggested??
Excuse my ignorance, I am a baking newbie!
Nano:
What was the temperature of the kitchen/room where the dough was set to rise?
Also what kind of yeast you used? There are chances that the instant yeast was too old and might have dies.
Thanks,
Gabi.
Pastry flour is usually labelled as “00” in Europe having very little gluten.
I am using all purpose unbleached and it worked.
Did you proof the yeast? Were you able to get the foamy surface on the yeast/water mix? Also what was the water temp?
g
Hi Gabi;
Thank you for your instant response.
I am positive that the yeast is fine, It gave the foamy surface, the water was not overheated and the first two rises worked fine (Actually, although in Julia’s book, she stated that the first rise should result in 3.5 the original size, mine did not get that high but it was more than double so I think it is fine.
The kitchen temperature in all rises was 75.
After rolling the croissant, I chilled them till morning and then I left them for 30 minutes at room temprature before cooking.
Let me know, if you have any further suggestions based on my previous responses.
If not, I will try it one more time next weekend and let you know what happens.
Thank you so so much for your feedback
Nano
Thanks for the response Gabi!
I used the combination of unbleached regular flour and pastry flour, and I did add the two tablespoons of oil. The pastry flour was a little sketchy for me though, because it was whole wheat flour (it was all Whole Foods had) and I wasn’t sure if that would change the consistency of the croissants. Maybe it did. I’m going to try again with just regular unbleached flour.
I’ll let you know how the second attempt goes!
Thanks!
Courtney
Nano:
After you formed the Croissants, did you leave them to rise for about 1 hour or so?
Also I suspect you went through all the turns ( 1 to 4), right?
Courtney:
Definitely the whole wheat changes the texture. Try using King Arthur’s all purpose unbleached flour. You can find that at Whole Foods.
Let me know how it turns out!
Hi Gabi;
In my first trial, I left them to rise for an hour and half at room temperature. In my second trial I left them to rise in the fridge over night and I put them at room temperature for half an hour before baking.
And, No No, I would not cheat 🙂 I made turn 1 and 2 then I chilled the dough (after this chilling it does not inflate though!!) then I did turn 3 and 4.
Do you think, maybe I applied too much pressure to roll the dough to 15 by 5 or this is irrelavent?
Nano,
I don’t think pressure can overcome the rising power of the yeast. Time is of essence in rising but it sounds like you had those down perfectly fine. Did they grow after you shaped them into Croissants?
I am starting to suspect the flour type. You mentioned that you used bleached. What brand was that? Did you add the 4 Tbs of oil to that?
Also this worries me: “After rolling the croissant, I chilled them till morning and then I left them for 30 minutes at room temprature before cooking.”
Where did you chill the dough – fridge or freezer? I think you should have give them at least 1 hour of rising time after that chill to get them to puff up more.
If you feel like trying again, try doing that – letting them to rise at least one hour on the tray that will go into the oven. Let me know.
Thanks Gabi for your instant feedback!
I used pillsbury bleached flour but I used only 2 table spoons of oil not 4!
I chilled them in the fridge not in the freezer for a slow rise. Actually, they did not rise much !! 🙁
I bought unbleached flour and I will try again on Saturday(hopefully). I will let them rise for an hour in room temperature and I will let you know what happens !!
how much yeast in the croissant mix? thanks for the time you put into helping us.
Hi Gabi;
I tried the croissant again yesterday and they came out much better!
I guess it was the flour, this time I used half a cup of cake flour and completed the rest with unbleached all purpose flour !!
Thank you so much for your help!
Nano!
You are a trooper! I admire your persistence! You inspire me! Next time try using completely unbleached flour and see if it improves more. Thanks!
My pleasure, Aaron – I used 1 Tsp dry yeast for the recipe I have in the post here. You can go up to 2 Tsp.
I’m in the midst of this recipe and so far so good. They’re on their last round of chilling. Next will be the final roll and cut. I’m excited to taste!
the website is actually a link to the photo i took of my finished product.
as you can see i got lots of nice flaky layers, but i think i forgot to do the last turn, regardless, i’m still happy with the overall LOOK of the product.
i was a little suspicious of your recipe because 475 seems very hot and for not very long time. i was right, the insides were still doughy and not fully cooked. i turned the temperature down to 450 and back in the oven for another 10, still not completely done in the middle but whatever. just a note: other julia child croissant recipes suggest 350 degrees for 12 minutes, a rotation and then another 4-6 mins. i will try this baking method in the future.
also, the final product came out tasting very yeasty, at least the undercooked parts did but maybe that’s normal. perhaps i did not let it rise for long enough? or maybe the rolls were simply too thick.
also, i had some issues with the dough. i used all purpose unbleached flour (chat forums on chow.com suggest that AP flour is just fine for croissants, but i am curious to try this again with pastry flour) and all of the allotted liquids, and my dough was kind of well… dry. not crumbly, but it was nowhere near as sticky as it looks in your photos, even from the initial turn out onto the board. i’ve questioned whether this is due to humidity or ingredients… still playing with it… next time i will use more milk. so the dough was smooth after kneading but when it came to rolling in the final turn it began to tear/split and i kept finding butter on my board. which is why i just went ahead rolled it out and cut instead of doing the final turn (did i do the final turn? i cant even remember now)
so all in all, they look gorgeous but taste a bit yeasty and the temperature is suspiciously high. also, the dough was a bit dry for me, but i also had an issue with another croissant dough i tried so it may be the altitude or humidity where i’m at.
thank you so much for the awesome instructions and photos which make a huge difference!
Seev!
Thanks for the comment – please keep me posted on the outcome!! Cheers!
Very nice croissant there!! Looks like what I am pulling out of the oven! Congrats!
Interesting what you are saying with the temperature – I followed her indications from her show and I guess I stuck with that. But I see no problem in baking them at a lower temperature, and slightly longer. The thing is, I have a very old oven where the door doesn’t close all the way like on the new ones, so it might be that there’s some temperature loss that brings my temp down to 450F. I’ll try the 350F next time also. Good point!
Yeasty taste, and size. Yes, I admit I detected an yeasty taste in mines also. I always strive to make 12 Croissants out of a batch. That division ensures a cute smaller size Croissant that cooks through every time.
Dough consistency. It might be the humidity in my air indeed, and/or the flour type I am using. I also found differences between flour brands – I am using Ceresota. I tried a batch with an Italian “00” (lower gluten content) type flour and even if the dough was workable, etc., it wasn’t that chewy – thing that some like but I kinda enjoy some gluten formation in it.
For the sake of a workable dough I’d juggle with the water content just a little. Some flour types absorb more water than other ones.
Try it again with the changes you mentioned and keep us posted!
Thanks again!
Hello!
Thank you for your step by step instructions! I’ve been looking for a croissant recipe for some time and this one looks delicious. But I do have some questions for you.
1. I need to make 14 for my class at school. Is there a way I can make them smaller instead of doubling the recipe?
2. Must I use another flour with my all-purpose flour? If so what kind? Is cake flour an option?
3. For the 2 hour chill before you roll them, can I chill them overnight instead, or would that effect the outcome?
Thank you soo much for your time!
Hi Lulu! Thanks for the comment and compliments!
1. I would use the same quantity but somehow divide the dough into two (after the folds), roll them and make 7 triangles out of each one. You’ll have to improvise with the triangle geometry a little to get 7 out of each half, but it should be doable.
2. Not really. Julia mentions a mix of cake flour and all-purpose in the show (1 part all-purpose, 2 parts pastry flour). For the first time I used all-purpose unbleached only with the 2 Tbs of veg oil.
3. The overnight chill in the fridge will actually enhance the flavor. I did that many times. It is the rule of thumb with almost every leavened dough (pizza, bread, etc.)
Let me know how it turned out!!!
Thanks for responding Gabi! I mad the croissants the day I posted my last comment and I just used all purpose flour. They came out good! The only thing I would change next time would be to put more salt than I did. I didn’t put the measurements of salt you had requested because I didn’t think it would need that much with the butter. I was wrong. We ended up putting butter on them! haha Another thing I wish I knew was that my oven has a super hot spot because after I put them in they were looking fine and then I smelled something. They looked fine on top but were burnt on the bottom. But it was okay because with my mom’s help we scraped the bottoms of those croissants and then they were fine. They were a hit in my class! Thanks again!
Lulu4me:
That’s great news! More butter on the croissants? Won’t hurt a bit! Lol… Yep – hot oven spots are evil. You might want to tame that down by popping in a baking stone on each rack. Don’t buy the expensive ones – use Alton Brown’s advice, go to your local construction materials supply and beg them for two stones. It will help tame your oven.
Hi Gabi,
I start making these beautiful croissants last night and now I am baking them. they smell yummy! I can not wait any more! thanks for the recipe and keep up the good work! I just found your website actually about a month ago but I made almost everything that you have posted so far.
Regards Milad